EN
EN

Table of contents
Facelift before and after photos are paired images that show a patient’s face before surgery and after healing, used to reveal how repositioning the deeper facial tissue lifts the cheeks, jawline, and neck. They are one of the most useful tools for anyone researching this procedure, because they show what a facelift can realistically change and what it cannot. In my clinical experience, patients learn far more from a careful, side-by-side reading of these images than from any single dramatic photo. This guide walks you through how to interpret them like a surgeon and set expectations you can actually trust.
Before you scroll through a gallery, it helps to understand the structure underneath the skin. A modern facelift does not simply pull the skin tighter. Instead, it lifts and resets the deeper support layer of the face, called the SMAS (the supportive sheet of muscle and fibrous tissue that sits just under the skin and fat). When you know that this deeper layer is being moved, the changes you see in the photos start to make sense.
What Facelift Before and After Photos Reveal
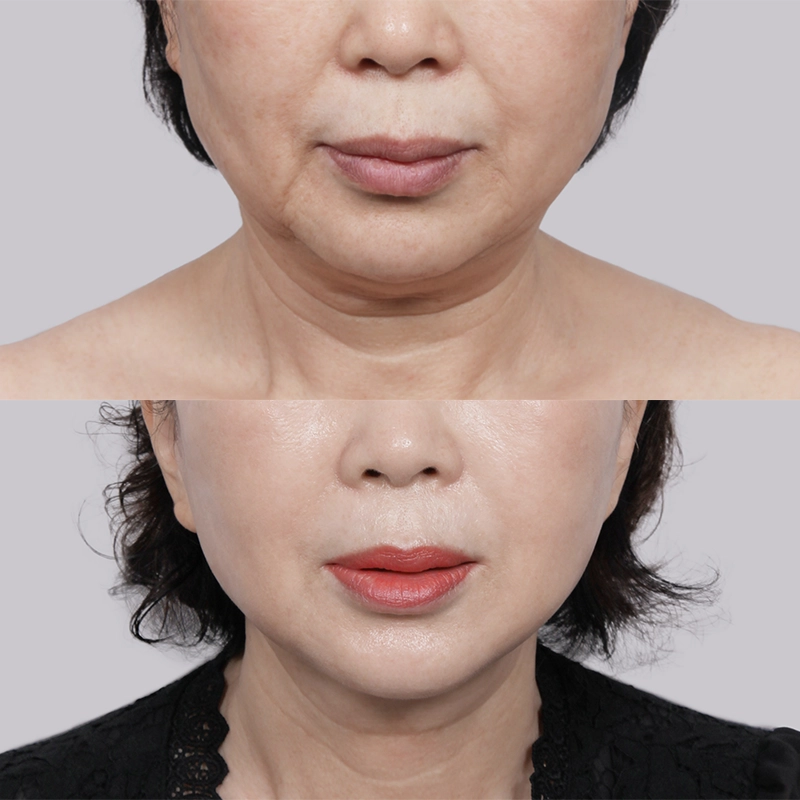
The clearest message in good facelift before and after photos is a change in the overall shape of the face. As we age, the supportive tissue and fat of the midface gradually slide downward, and the youthful triangle (wide at the cheekbones, narrow at the chin) flattens or even inverts. This is the single biggest shift that facelift before and after photos are meant to capture. Medical texts on facial aging describe this as a change in the relationship between the superficial and deeper layers of the face. A facelift restores that relationship by moving the deeper soft tissue back up toward the facial framework, which is why a well-done result looks rested rather than stretched.
It helps to think of a face in three layers: the skin on top, a cushion of fat beneath it, and the SMAS support sheet below that, all anchored to the bone by small ligaments. Surgical references explain that aging loosens these ligaments and lets the fat and SMAS drift down and forward. That single mechanism explains nearly everything you see in facelift before and after photos: the deflated cheek, the deepened smile line, the soft jowl, and the loose neck are all the same descent showing up in different places. When you read the images with that map in mind, you stop seeing unrelated problems and start seeing one process being reversed.
Cheeks and Midface
Start by comparing the cheeks. In the “before” image the midface often looks deflated, with volume that has dropped toward the smile line. In a strong “after” image, that volume sits higher on the cheekbone again. Surgical literature explains the mechanism simply: lifting the SMAS in a more vertical direction adds fullness to the malar area (the cheekbone region) while reducing heaviness just below it. This vertical repositioning is the anatomic reason cheeks look lifted and a full face can appear slimmer in the after photo, without any implant or filler being added.
There is a subtle clue that separates real surgery from a flattering photo. When the lift comes from the SMAS, the cheek fullness in facelift before and after photos appears higher on the face, sitting back on the cheekbone where it belongs. When fullness is added with filler instead, it tends to sit lower and rounder. A genuine surgical after photo also shows the area just below the cheekbone looking lighter, because the heavy tissue that used to pool there has been moved up. If the cheek looks plumper but the lower face is unchanged, you are probably looking at volume that was injected, not lifted.
Jawline and Jowls
Next, follow the jawline from the ear to the chin. Jowls form when descended fat and lax tissue gather along the lower face and blur a once-clean jaw edge. In facelift before and after photos, look for a smoother, more continuous jawline and less bunching in front of the jowl after surgery. In the deep-plane technique, the surgeon releases the small ligaments that tether the SMAS in place, so the deeper layer and the overlying skin move together as one unit. Because they glide and resettle as a single layer, the lift tends to be more stable and longer lasting, which is the crisp, natural jaw edge you are tracing in strong facelift before and after photos.
Neck and Skin Quality
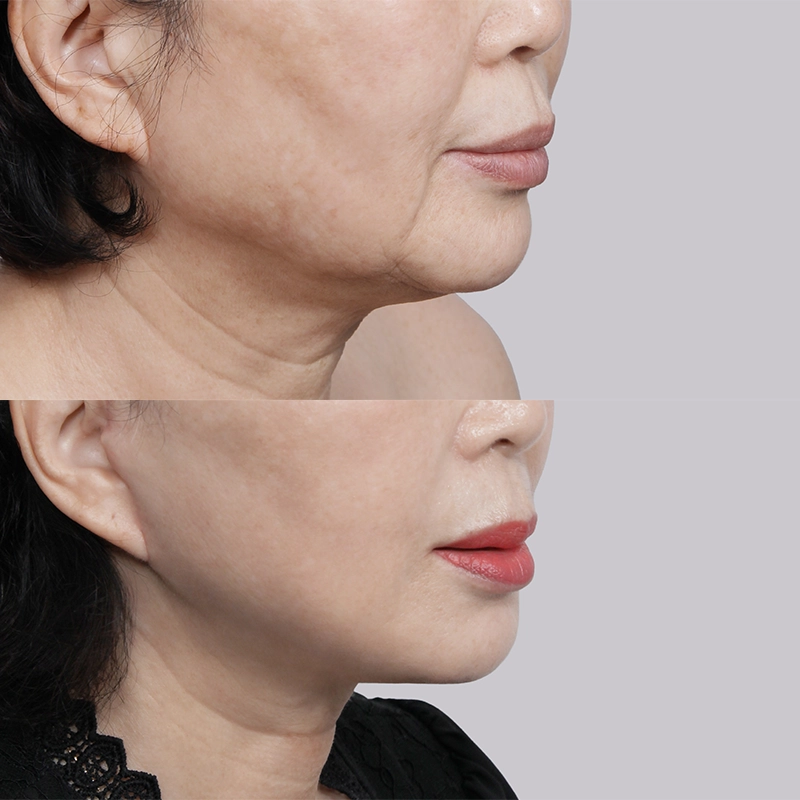
The neck is often where the most striking change appears, since loose neck skin and vertical bands are common signs of aging. Surgical references note that laxity of both the SMAS and the skin’s supporting ligaments drives much of this change, and that the same deeper layer is used to reposition tissue in the lower face and under the chin. In the photos, look for a sharper angle between the chin and neck and fewer loose folds. Keep in mind that a facelift mainly tightens and repositions; it does not resurface the skin. Fine lines and texture may look softer simply because the skin is no longer slack, but surface treatments are a separate step some patients choose to add.
The neck is also where facelift before and after photos are easiest to misjudge, because a chin-down pose can hide loose skin and a chin-up pose can exaggerate a tight result. This is why the neck deserves a profile view, not just a front shot.
When you find a true side-by-side profile, trace the line from the chin down to the front of the neck: a youthful result shows a clear, near-right-angle corner there, while an aged neck shows a soft, blunted curve. Vertical bands, which are the front edges of a thin neck muscle drifting apart, should look calmer in the after image. If they are gone completely in a single front photo, ask whether a separate neck procedure was added.
How to Analyze the Photos Like a Surgeon
Once you understand what a facelift moves, you can read facelift before and after photos the way a specialist does. The goal is not to be wowed by a single image but to read facelift before and after photos region by region, in order, across both shots. You can read more about the kinds of change these images capture in our overview of the visible effects of a facelift.
Focus Areas: Midface, Lower Face, Neck
Scan three zones evenly rather than fixating on one feature:
- Midface: Check for restored cheek volume and a softer, not erased, smile line (nasolabial fold).
- Lower face: Look for a defined jawline and reduced jowling.
- Neck: Note tighter skin and a cleaner chin-to-neck angle, with fewer vertical bands.
Experienced surgeons tend to move through these areas quickly and evenly, rather than dwelling on one spot. They are looking for balanced, three-dimensional improvement, not a single feature that has been dramatically pulled.
Spotting Natural Versus Over-Tightened Results
A natural result keeps the patient looking like themselves, only refreshed. The aim of a two-layer SMAS facelift is a result that does not look obviously operated on; surgical texts describe this as a “non-surgical in appearance” outcome, meaning the lift comes from the deeper layer rather than from tension on the skin. In my consultations I tell patients to look for a refreshed version of themselves, not a different face. Warning signs of an over-tightened look include a windswept pull near the ears, a flattened cheek, or an unnaturally sharp, mask-like quality. To understand how different methods achieve a natural lift, compare them in our guide to the different facelift lifting techniques and how they compare.
A simple test helps when you scan facelift before and after photos for naturalness: look at the area in front of the ear and at the hairline. If the skin there looks stretched flat or the sideburn has been pulled out of position, the lift relied too heavily on skin tension.
In a deep-plane or extended-SMAS lift, the deeper layer carries the load, so the skin in front of the ear should look relaxed even though the jaw and neck are clearly improved. The other clue is the earlobe: a natural result leaves it sitting softly, while a stretched-down or forward-pulled lobe is a classic sign that the skin was over-tightened. Reading these small details tells you more than the obvious change in the jawline.
Setting Realistic Expectations From Before and After Photos
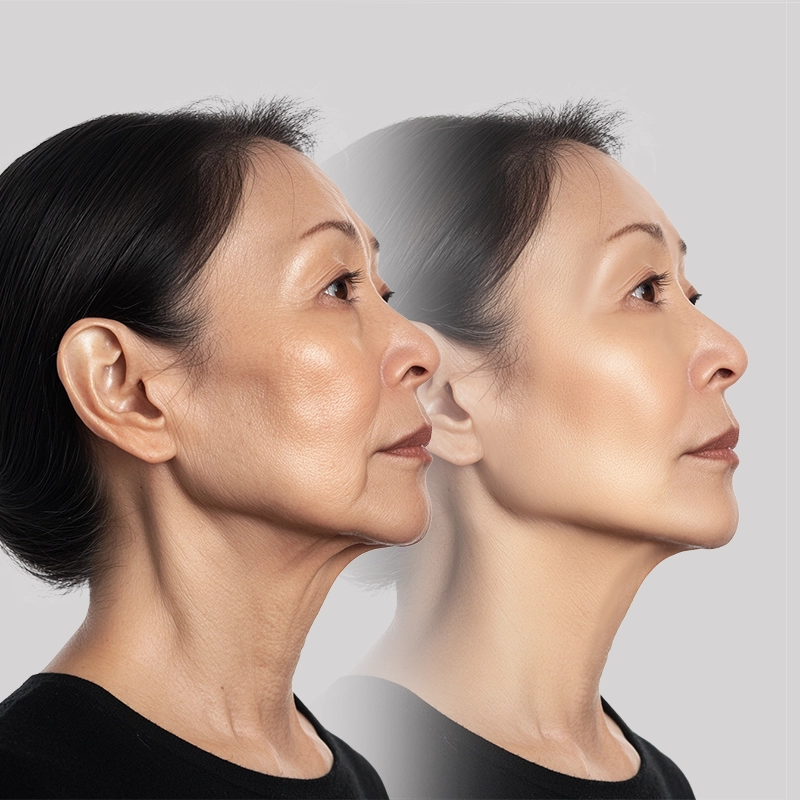
Reading these images well also means knowing their limits. A photo gallery shows possibilities, not promises, and individual anatomy plays a large role in the final outcome. The American Society of Plastic Surgeons, the American Society of Plastic Surgeons facelift resource, is a useful authority for understanding what the procedure can and cannot achieve.
The most useful way to use facelift before and after photos is to find a patient whose starting point resembles your own. Facelift before and after photos are most honest when the “before” image looks like you: similar age, similar skin thickness, similar amount of descent in the cheek and neck. A dramatic transformation in someone with very loose skin tells you little about what to expect if your own changes are early and subtle. In my experience, patients set far more realistic goals when they study results from a similar starting point than when they are drawn to the single most striking pair in the gallery.
Why Some Nasolabial Folds Remain
One of the most common surprises when reading facelift before and after photos is that the smile lines do not vanish entirely. This is expected, not a failure. Surgical literature notes that even when the surgeon repositions descended fat, the jowl and the nasolabial fold may only partially correct, a situation described as undercorrection. So a faint residual fold in an after photo is normal and realistic. A facelift softens and lifts these areas; it is not designed to erase them, and facelift before and after photos that show totally smooth, fold-free smile lines may have been edited or combined with other treatments.
The reason is anatomical. The smile line sits where the cheek meets the upper lip, an area held down by its own ligament, so lifting the cheek eases the fold but cannot pull the crease completely flat. This is why honest facelift before and after photos still show a gentle line there. When patients ask me to make that line disappear entirely, I explain that the realistic goal is to soften it, and that chasing a completely flat result usually means over-pulling the face. A small, natural fold is a sign the surgeon respected the anatomy rather than fighting it.
Consistency, Time Frame, and Combined Procedures
Three checks keep your comparison fair:
- Consistency: The lighting, camera angle, and facial expression should match in both photos. Soft lighting and a relaxed expression can flatter any face, so unmatched conditions make a result look better than it is.
- Time frame: Reliable after photos are usually taken at least 3 to 6 months post-surgery, once swelling has settled. An image taken too early may understate or overstate the final result.
- Combined procedures: Some galleries pair a facelift with eyelid surgery, a brow lift, or fat grafting. Confirm what each photo actually shows so you do not credit the facelift alone for every change.
The time frame deserves a closer look, because healing is gradual. In the first weeks after surgery there is swelling and bruising, and the face can look tight or slightly unnatural before it settles. The deeper tissues need months to soften and the final contour to emerge, which is why a responsible surgeon waits before taking the after image. If a result looks startlingly flawless only a week or two post-op, the swelling may be doing some of the work, and the picture will not represent where the face lands once everything relaxes into place.
Your own anatomy, including bone structure, skin elasticity, and lifestyle, will shape your result, so treat any gallery as a guide rather than a guarantee. For the full picture of what the surgery involves, see our complete guide to facelift surgery, from effects to side effects.
The Role of Photo Angles and Technology
The angle a photo is taken from changes what you can judge, and a single view rarely tells the whole story. Trustworthy facelift before and after photos show the same patient from more than one direction, because each angle reveals a different part of the result.
Front, Profile, and 45-Degree Views
- Front view: Ideal for judging overall facial balance and symmetry.
- Profile view: Ideal for assessing the neck and the chin-to-neck angle.
- Oblique (45-degree) view: Ideal for seeing cheek volume and the smile line.
Eye-tracking research is interesting here: viewers often look at the nose first, while trained surgeons quickly direct their attention to the cheeks, chin, and neck, where the meaningful changes are. When you read facelift before and after photos, borrow that habit and check the regions that matter rather than the parts that simply draw the eye. Choosing a surgeon who photographs results honestly is part of the decision, which is why it helps to read our advice on how to choose a qualified facelift specialist.
Imaging Tools and Their Limits
Some clinics use simulation software to preview a possible outcome before surgery. These tools can help a conversation, but they show an estimate, not a promise, and they cannot account for how your tissue will heal. Photos also freeze a face in one moment, so they cannot capture how you look when you smile, talk, or move. Use galleries and simulations together with an in-person consultation, where a surgeon can assess your skin, bone structure, and goals directly and give you an individualized, realistic plan.
Frequently Asked Questions
Here are the questions patients most often ask when learning to read facelift before and after photos.
How do you read facelift before and after photos correctly?
Compare the same angles under similar lighting and expression, then check three zones in order: the cheeks and midface, the jawline and jowls, and the neck. Confirm the after photo was taken at least 3 to 6 months post-surgery, once swelling has settled, so it reflects the true result.
What changes should I look for in facelift results?
Look for lifted cheek volume, a defined jawline with fewer jowls, a tighter neck with a cleaner chin-to-neck angle, and an overall natural, refreshed appearance. The face should look like a rested version of the same person, not pulled or mask-like.
Why do some nasolabial folds remain after a facelift?
Repositioning the descended tissue improves the smile line but may not erase it. Surgical literature describes this partial result as undercorrection, so a faint residual nasolabial fold in an after photo is normal and expected rather than a sign of a poor outcome.
How long after surgery are accurate before and after photos taken?
Surgeons usually present photos taken at least 3 to 6 months after surgery, once swelling has subsided. By that point the tissues have settled, so the image reflects the stable, long-term result rather than an early, temporary appearance.
If you are weighing a facelift, the most reliable next step is a personalized assessment. Our board-certified specialist, Dr. Lee Sung-wook at MINE, can review your facial structure in person and explain the realistic, individualized changes a facelift could make for you. Reading before and after photos is a great start; a tailored consultation turns that understanding into a plan that fits your face.
※ This content is for informational purposes only and does not replace professional medical advice, diagnosis, or treatment. Individual results may vary, and side effects may occur. Please consult with a board-certified plastic surgeon for personalized advice.
※ This content is for informational purposes only and does not replace professional medical advice, diagnosis, or treatment. Individual results may vary, and side effects may occur. Please consult with a board-certified plastic surgeon for personalized advice.