EN
EN

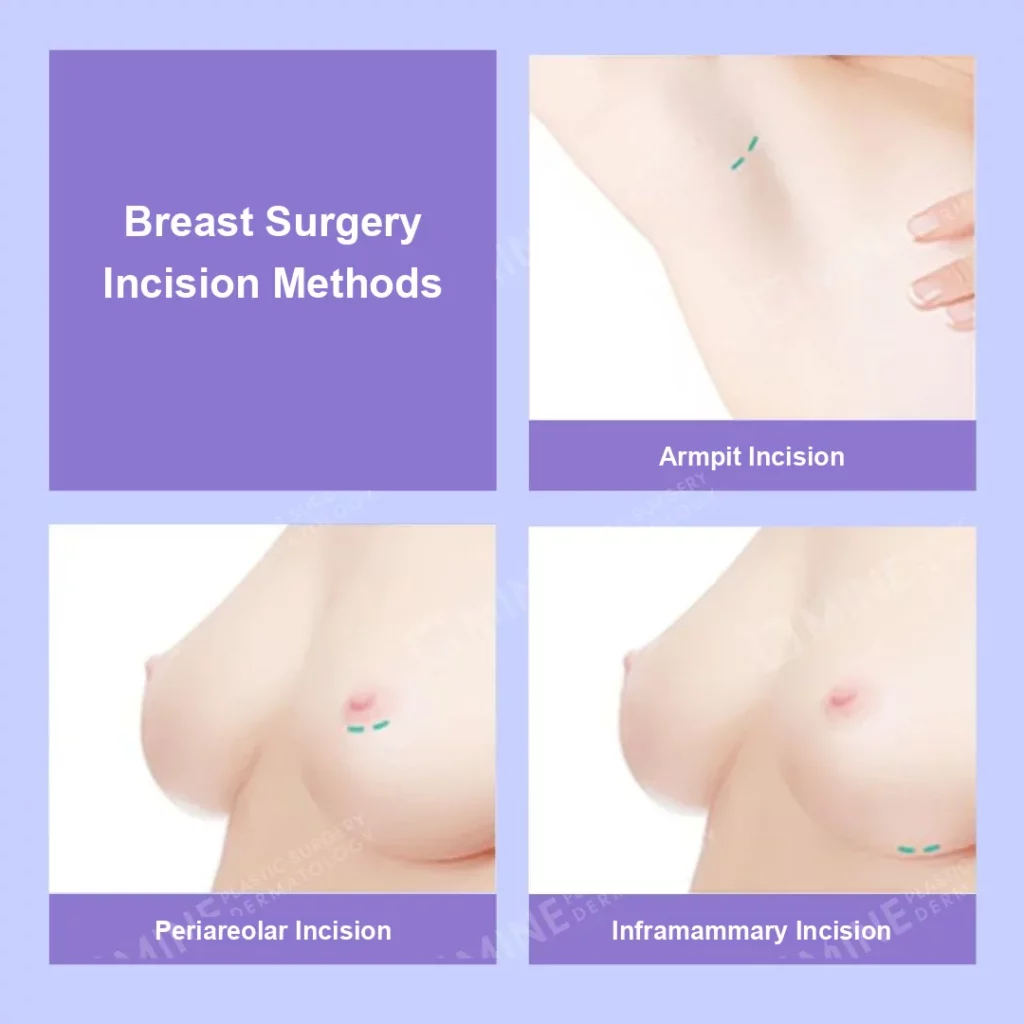
The breast augmentation incision location is the point where the surgeon enters to place the implant: the breast crease (inframammary), the edge of the areola (periareolar) or the armpit (transaxillary). It affects how clearly the surgeon can see the implant pocket, how you recover and what happens to nipple sensation, not just where the scar sits.
“I’m more worried about the scar than the surgery itself.” “Should I go through the armpit, the areola or the crease? I honestly can’t decide.” I hear some version of both of these in my consultation room almost every week. Deciding to have breast surgery already takes courage, and then a second question comes up: where should the cut go?
I am Dr. Lee Sung-wook, a board-certified plastic surgeon and the director of Mine Plastic Surgery in Gangnam, Seoul. In this article I compare the three common incisions side by side, explain the six factors I use to choose between them, and answer the questions women ask most about breastfeeding and nipple sensation. Where a point comes from plastic surgery textbooks, I say so. Where it is our own clinical experience, I say that too.
- Why Breast Augmentation Incision Location Matters More Than the Scar
- Inframammary (Breast Crease) Incision: The Most Common Route
- Periareolar (Around the Areola) Incision: Benefits and Trade-Offs
- Armpit (Transaxillary) Incision in Brief
- 6 Factors for Choosing Your Breast Implant Incision
- Breastfeeding and Nipple Sensation by Incision
- Recovery Timeline and 6 Rules After Any Incision
- Frequently Asked Questions About Breast Augmentation Incisions
- Choosing Your Incision With Your Surgeon
Why Breast Augmentation Incision Location Matters More Than the Scar
Most women first think about the incision as a scar question. That is understandable, but the scar is only one part of the decision. Your breast augmentation incision location also decides the path the implant travels, how directly the surgeon can see the space being created, and which tissues are crossed on the way in.
What the incision changes besides the scar
A breast is built in layers. From the outside in, there is skin, a layer of fat, the breast gland (the milk-producing tissue with its ducts), the large chest muscle called the pectoralis major, and finally the ribs. The implant usually sits either under the gland or under the chest muscle, in a space the surgeon creates called the pocket.
The closer the incision is to that pocket, the easier it is to see clearly while working. The farther away it is, the more the surgeon relies on special instruments, such as an endoscope (a thin camera), and on technique. The gland also contains milk ducts, small nerves and blood vessels. So depending on the route, the incision can be linked to later questions about nipple sensation and breastfeeding.
Here is the short version of how the three incisions compare:
| Feature | Inframammary (breast crease) | Periareolar (areola edge) | Transaxillary (armpit) |
|---|---|---|---|
| Where the cut is | In the natural fold under the breast | Along the lower border of the areola | In a natural armpit crease |
| Scar visibility | Hidden in the fold in most everyday positions | Blends into the color change at the areola edge | None on the breast; may show when the arm is raised |
| Surgeon’s view of the pocket | Most direct | Close, with good access | Farther away; endoscope helps |
| Passes through breast gland? | No, enters below it | Yes, near ducts and nipple nerves | No, enters from the side |
| Often suits | Sagging, revision, larger implants | Larger or darker areolas, areola reduction | Women who want no scar on the breast, little sagging |
| Main watch-out | Scar sits on the breast itself | Nipple sensation and breastfeeding questions | Less suited to sagging or revision |
Choose the implant first, then the incision
This is the order most patients do not expect. The standard plastic surgery textbook on the breast describes four incision options for augmentation: inframammary, periareolar, transaxillary and transumbilical (through the belly button; this route is rarely used and is not covered here). It then states that the incision should be chosen after the implant has been selected, based on the surgeon’s experience with the technique, the patient’s wishes, and which route gives the best control and view for that implant.
In practice, this means a very large implant, a particular implant shape or a revision case can narrow your options before scar preference even enters the discussion. If you are still comparing implant types and sizes, our breast implants guide is a good place to start.
Inframammary (Breast Crease) Incision: The Most Common Route
When it comes to breast augmentation incision location, the inframammary incision is placed in the natural fold where the lower breast meets the chest wall. Plastic surgery textbooks describe it as the most commonly used incision because it gives direct access to the pocket and a clear view of it, with the least injury to the surrounding structures. Put simply, the surgeon works almost face to face with the space where the implant will sit.
Who it suits: sagging, revision, larger implants
Because the view is so direct, this route makes it easier to adjust the implant’s position precisely. In my clinical experience, it is often the first option I discuss in these situations:
- Breasts with some sagging, where the lower pocket needs careful shaping.
- Revision surgery, such as replacing an implant or treating a problem from a previous operation.
- Larger implants, which need a clear path and room to be placed without force.
- Cases where exact implant position matters most, for example when the two sides start out uneven.
If you are considering an implant exchange or correction, you can read more about breast revision surgery at our clinic.
Scar and recovery: stitches out in about 7-10 days
Stitches after an inframammary or periareolar incision are typically removed about 7-10 days after surgery. The scar lies in the crease, so in most standing positions and in everyday clothing it stays hidden under the natural curve of the breast. It is still a scar on the breast itself, which some patients see more clearly when lying down or lifting their arms.
There is one trade-off worth knowing: a breast surgery reference notes that a tender, cord-like vein under the skin of the lower breast (superficial thrombophlebitis, sometimes called Mondor’s disease) occurs most often with the inframammary approach. It is uncommon, and it usually settles on its own over several weeks with warm compresses. If you are prone to thick or raised scars (keloid tendency), tell your surgeon early so that scar care can start as soon as the wound has healed.
Dr. Lee’s Key Point: The crease incision gives the surgeon the most direct view of the pocket. That is why it is the usual choice when precise implant position matters more than where the scar sits.
Periareolar (Around the Areola) Incision: Benefits and Trade-Offs
The periareolar incision follows the lower border of the areola, the darker skin around the nipple. Its main appeal is camouflage. The scar sits exactly where darker areola skin meets lighter breast skin, and the eye tends to read that line as a natural color boundary.
When the areola border hides the scar
This route tends to work well for women who have:
- A relatively large areola, which gives enough length for the incision.
- A clear color difference between areola and skin, which helps hide the line.
- Mild sagging that can be addressed at the same time.
- Plans for areola reduction, since both can be done through the same border incision.
When the areola is small or very pale, the incision has less room and less camouflage. In that case another route is often a better fit.
Capsular contracture and the ductal tissue question
Here is the part that needs to be discussed openly. To reach the pocket from the areola, the surgeon usually passes through or near breast gland tissue, which contains the milk ducts. Milk ducts open onto the nipple and normally carry a small number of skin bacteria.
This matters because of capsular contracture. Your body always forms a thin capsule of scar tissue around any implant. Capsular contracture is when that capsule thickens and tightens, making the breast feel firm and sometimes changing its shape. One plastic surgery textbook reports that capsular contracture affects as many as 15-30% of breast augmentation patients overall, which makes it the most common complication of the operation. That figure is for augmentation in general, not for any single incision.
The same textbook lists the periareolar approach among the factors linked with capsular contracture, presumably because of more bacterial contamination from the ductal tissue. Other factors on that list include infection, placing the implant above the muscle, smooth-surfaced implants and a collection of blood around the implant (hematoma). In other words, the incision is one factor among several, not a guarantee of a problem. You can learn how it is recognized and treated in our guide to capsular contracture.
Because this incision is close to the nerves that supply the nipple, nipple sensation can also take longer to return than with other routes. The wider list of possible complications is covered in our article on breast augmentation side effects.
Dr. Lee’s Key Point: The areola incision hides the scar well, but it crosses the tissue that matters for breastfeeding. If you plan to have children, raise it in your consultation before the decision is made.
Armpit (Transaxillary) Incision in Brief
The transaxillary incision is placed in a natural crease of the armpit, so no scar is left on the breast itself. It is especially popular with women who have not yet had children. Because the armpit is farther from the pocket, at Mine we use an endoscope during this approach so that the space can be created under direct view rather than by feel.
Where it fits in the comparison
Compared with the other two routes, the armpit incision usually suits women with little or no sagging who want no scar on the breast itself and prefer a route that avoids the breast gland. It is less suited to marked sagging and to most revision cases, where the crease incision gives better access.
When to read the full armpit guide
Technique, arm-movement limits and recovery for this route are explained in detail in our separate guide to transaxillary (armpit) breast augmentation. If the armpit is your leading option, read that article next.
6 Factors for Choosing Your Breast Implant Incision
Patients sometimes arrive having already picked an incision based on online reviews, as if the breast augmentation incision location were a simple matter of taste. In my experience, the right incision cannot be chosen on preference alone. I look at six factors together:
- Degree of sagging (ptosis): how low the nipple and breast sit relative to the crease.
- Areola size and color: whether the areola is large and dark enough to hide a scar.
- Skin thickness and elasticity: how well the tissue covers and supports the implant.
- Implant type and size: larger or firmer implants need a clear, roomy path.
- Revision history: earlier scars, pockets and capsules change the plan.
- Scar tendency: a history of thick or raised scars (keloids) affects where a scar is safest.
Ptosis and areola size/color
Sagging is usually the first filter. Mild sagging can often be managed through the crease or the areola. When sagging is more marked, the crease incision gives the best control, and some women actually need a breast lift rather than an implant alone. A lift is a different operation, and its incisions (around the areola, vertical or anchor-shaped) are not the same as augmentation incisions. A large, dark areola makes the periareolar route more attractive; a small, pale one makes it less so.
Skin thickness and elasticity
Thin or loose skin hides less and stretches more. With thin coverage, precise pocket control becomes more important, which tends to favor the more direct routes. Firm, elastic skin with good coverage gives more freedom of choice, including the armpit.
Implant type and size
As the textbook’s implant-first order suggests, this factor often outweighs the others. A larger implant needs a longer incision and a clear path, so the crease is frequently the practical choice. Smaller implants in a patient with little sagging leave all three routes open.
Revision history and scar tendency
If you have had breast surgery before, the existing scars, the old pocket and the state of the capsule all matter. Revision is often done through the crease because the surgeon can see and treat the old capsule directly. If you form keloids, your surgeon may prefer a site where any scar is easier to hide and treat.
Here is how each factor tends to lean. These are tendencies, not fixed rules, and a single factor can outweigh the others in an individual case:
| Your situation | Often leans toward | Why |
|---|---|---|
| Little sagging, want no scar on the breast | Armpit | Breast skin stays untouched |
| Noticeable sagging | Crease (or a lift) | Direct control of the lower pocket |
| Large or dark areola, interest in areola reduction | Areola | Scar hides on the color border |
| Large implant | Crease | Clear path and room for placement |
| Previous breast surgery | Crease | Best access to the old pocket and capsule |
| Keloid-prone skin | Discussed case by case | Scar site and early scar care both matter |
Dr. Lee’s Key Point: Choose the incision that lets the implant go in most safely for your anatomy, not simply the one with the least visible scar.
Breastfeeding and Nipple Sensation by Incision
For many women, this is the real question behind the scar question. Your breast augmentation incision location matters here because of what the route crosses. Milk ducts run from the gland toward the nipple, and the nerves that give the nipple its sensation run through the breast toward the areola.
- Armpit: enters from the side and does not cut through the gland, so it avoids the breast tissue itself.
- Crease: enters below the gland at the fold, so it generally does not pass through the ducts either.
- Areola: goes through or near the tissue around the ducts and the nipple nerves, so it is more likely to affect both.
No incision can promise that breastfeeding will be unaffected, and no honest surgeon can give you an exact percentage for your own body. Breastfeeding also depends on your gland tissue, the implant size and position, and factors that have nothing to do with surgery.
What to ask before surgery if you plan to breastfeed
If children are part of your future, bring these questions to your consultation:
- Will this incision go through my breast gland, or around it?
- Will the implant sit above or below the chest muscle, and why?
- How large an implant are you planning, and does that affect the route?
- What should I expect for nipple sensation in the first months?
After surgery, some temporary numbness or extra sensitivity around the nipple is common while nerves recover. With the areola route this may take longer. If numbness persists for many months, or one side changes suddenly, report it to your surgeon.
Which profile fits which incision: before pregnancy, revision, sagging
| Patient profile | Incisions often discussed first | Notes |
|---|---|---|
| Before pregnancy or breastfeeding | Armpit or crease | Avoids the gland; armpit leaves the breast scar-free |
| Planning to breastfeed | Armpit or crease | Areola route needs a careful discussion first |
| Revision surgery | Crease | Most direct view of the old capsule and pocket |
| Sagging breasts | Crease (sometimes with a lift) | Precise lower-pocket shaping |
| Large areola, wants areola reduction | Areola | One scar line serves both procedures |
Recovery Timeline and 6 Rules After Any Incision
Whatever your breast augmentation incision location, overall recovery is broadly similar across the three routes. A few differences are worth knowing. In our experience, swelling tends to be slightly milder with the crease incision because the surgeon reaches the pocket so directly. With the armpit route, you will need to limit arm exercise for a while. With the areola route, nipple sensation can take longer to return.
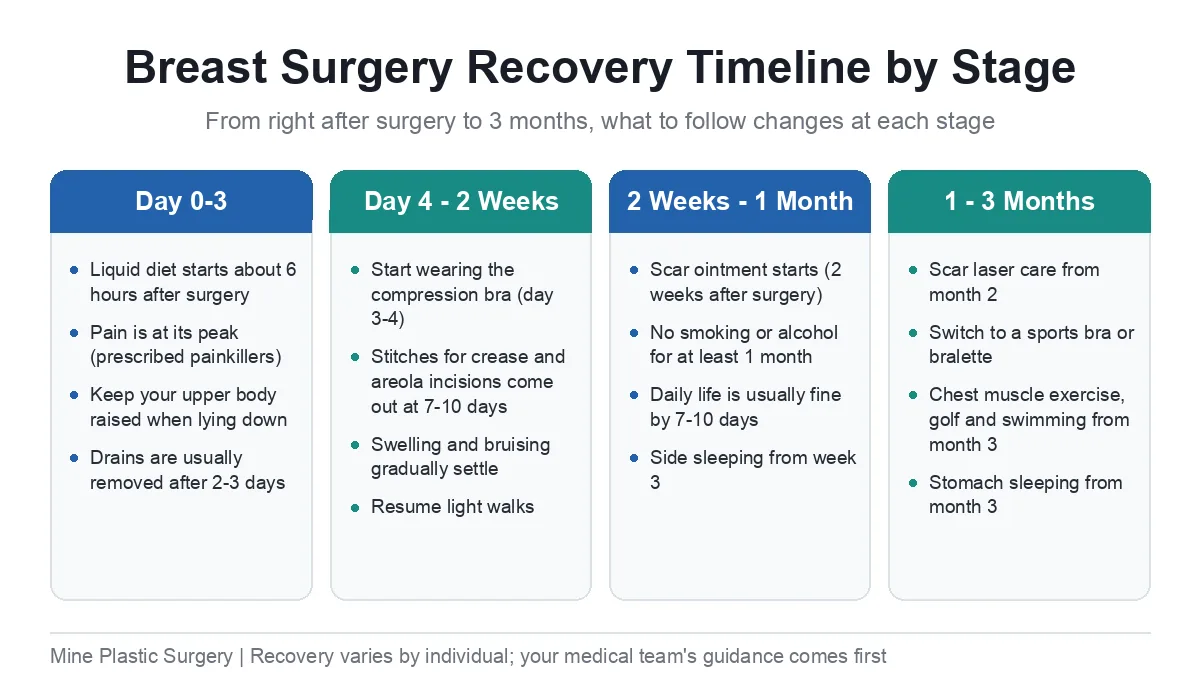
Recovery stages from day 1 to 12 months
| Stage | Timing | What usually happens |
|---|---|---|
| Right after surgery | Days 0-3 | Pain and swelling are at their peak; rest at home or in the clinic |
| First week | Days 4-7 | Daily life resumes gently; light activity; short walks |
| Stitch removal | About 7-10 days | For crease and areola incisions |
| Early healing | Weeks 2-4 | Much of the swelling settles; light exercise may begin |
| Settling | Months 1-3 | The implant settles and the breast shape softens |
| Maturing | Months 6-12 | The scar matures and the final result becomes clear |
Scars follow their own timeline. They usually look reddest and most noticeable for about the first 3 months, start fading after 6 months, and look much more natural by around 1 year. A scar never disappears completely, but in most people it fades toward the surrounding skin tone.
6 key rules for a smoother recovery
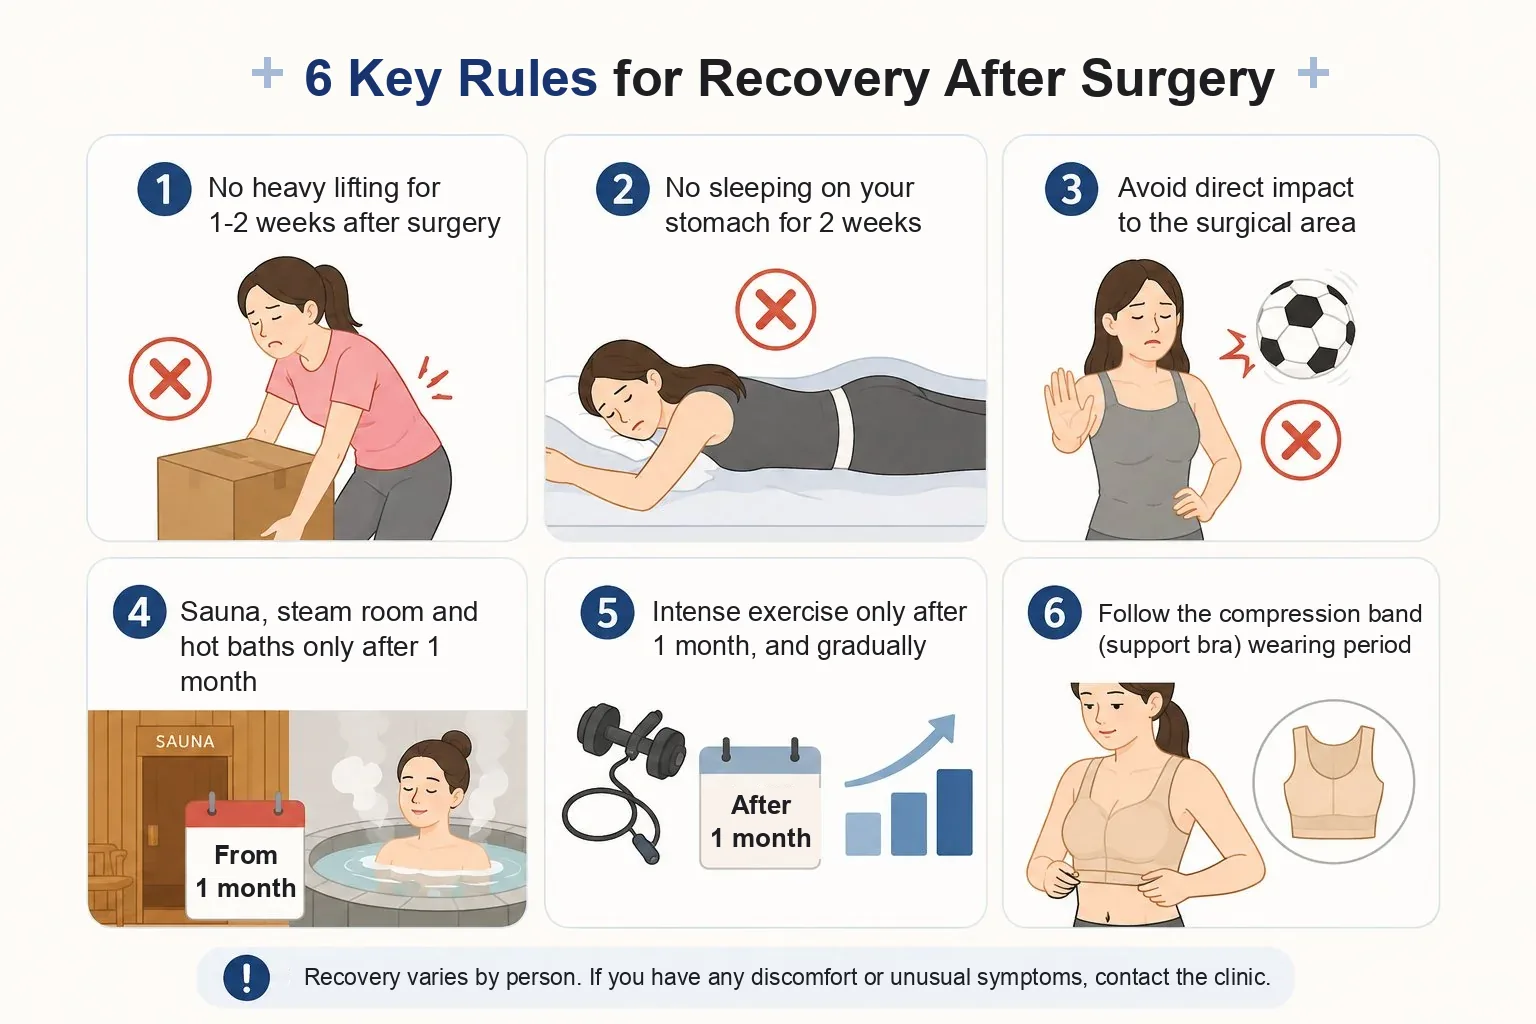
- No heavy lifting for the first 1-2 weeks.
- Do not sleep on your stomach for about 2 weeks.
- Protect your chest from direct pressure or bumps.
- Avoid saunas, hot baths and hot springs until about 1 month after surgery.
- Return to strenuous exercise gradually, starting no earlier than about 1 month and only after your surgeon agrees.
- Wear your compression band or support bra for as long as your surgeon advises.
Before surgery, tell your surgeon about every medicine you take, including aspirin and hormone tablets, and stop smoking and drinking at least 2 weeks beforehand. If you are thinking about changing the incision during a future operation, see our page on breast revision surgery.
Frequently Asked Questions About Breast Augmentation Incisions
Which breast implant incision is right for me?
There is no single winner. The choice depends on six factors: sagging, areola size and color, skin thickness, implant type and size, revision history and scar tendency. The crease incision is the most commonly used and the most flexible. The areola and armpit routes suit specific situations, and the decision is best made after the implant is chosen.
Can I still breastfeed after breast augmentation, and does the incision matter?
Many women can. The armpit and crease routes do not cut through the breast gland, while the areola route passes through tissue near the milk ducts, so it deserves a careful discussion if you plan to breastfeed. Results vary between individuals, and no incision can guarantee an outcome.
How long does nipple sensation take to return after a periareolar incision?
It varies from person to person, and it can take longer than with the crease or armpit routes because the incision is close to the nipple nerves. Temporary numbness or oversensitivity is common at first. If numbness lasts for many months, mention it at your follow-up visit.
Can I switch to a different breast augmentation incision location during revision surgery?
Often, yes. It depends on your existing scars, the old pocket and the condition of the capsule. Many revisions are done through the crease because it gives the most direct view. Revision needs a more detailed assessment than a first operation; see our breast revision surgery page for details.
When do breast augmentation scars fade?
Scars usually look reddest for about 3 months, begin fading after 6 months and look natural by around 1 year. They do not vanish entirely. If you tend to form keloids, early scar care such as silicone sheets may be recommended.
Does the incision affect the risk of capsular contracture?
It can be one factor. Plastic surgery textbooks list the periareolar approach among the contributors, along with bacterial contamination, implant placement above the muscle, smooth implants and hematoma. Your overall risk depends on all of these together, not on the incision alone.
Choosing Your Incision With Your Surgeon
Your breast augmentation incision location is not just a scar decision. It is a safety and results decision, and it is shaped by your anatomy, your implant and your plans for the future. Online reviews and simple comparisons cannot account for how different each woman’s tissue and lifestyle are.

When you come for a consultation, bring three things: your plans for pregnancy and breastfeeding, details of any previous breast surgery or scars, and your implant preferences. With those, we can decide together which route places the implant most safely for you. International surgeons’ societies such as ISAPS also offer patient information on choosing a qualified plastic surgeon. To arrange a consultation at Mine Plastic Surgery in Seoul, call +82-2-516-1175 or use our online consultation form.
Written and medically reviewed by Dr. Lee Sung-wook, Board-certified Plastic Surgeon (Korea), Mine Plastic Surgery, Seoul. Published October 3, 2026. Last reviewed October 3, 2026.
※ This content is for informational purposes only and does not replace professional medical advice, diagnosis, or treatment. Individual results may vary, and side effects may occur. Please consult with a board-certified plastic surgeon for personalized advice.